
最近读了《Python深度学习》, 是一本好书,很棒,隆重推荐。
本书由Keras之父、现任Google人工智能研究员的弗朗索瓦•肖莱(François Chollet)执笔,详尽介绍了用Python和Keras进行深度学习的探索实践,涉及计算机视觉、自然语言处理、生成式模型等应用。书中包含30多个代码示例,步骤讲解详细透彻。由于本书立足于人工智能的可达性和大众化,读者无须具备机器学习相关背景知识即可展开阅读。在学习完本书后,读者将具备搭建自己的深度学习环境、建立图像识别模型、生成图像和文字等能力。
各方面都很好,但是总感觉哪里有点欠缺,后来想想,可能是作者做得太好了,把数据预处理都做得好好的,所以你才能“20行搞定情感分析”,这可能也是学习其他深度学习工具过程中要面临的一个问题,很多工具都提供了预处理好的数据,导致学习过程中只需要调用相关接口即可。不过在实际工作中,数据的预处理是非常重要的,从数据获取,到数据清洗,再到基本的数据处理,例如中文需要分词,英文需要Tokenize, Truecase或者Lowercase等,还有去停用词等等,在将数据“喂”给工具之前,有很多事情要做。这个部分,貌似是当前一些教程有所欠缺的地方,所以才有了这个“从零开始做”的想法和系列,准备弥补一下这个缺失,第一个例子就拿《Python深度学习》这本书第一个文本挖掘例子练手:电影评论文本分类-二分类问题,这也可以归结为一个情感分析任务。
首先介绍一下这个原始的电影评论数据集aclIMDB: Large Movie Review Dataset, 这个数据集由斯坦福大学人工智能实验室于2011年推出,包含25000条训练数据和25000条测试数据,另外包含约50000条没有标签的辅助数据。训练集和测试集又分别包含12500条正例(正向评价pos)和12500负例(负向评价neg)。关于数据,更详细的介绍可参考该数据集的官网:http://ai.stanford.edu/~amaas/data/sentiment/, paper: Learning Word Vectors for Sentiment Analysis, 和数据集里的readme。
然后下载和处理这份数据:Large Movie Review Dataset v1.0,下载链接;
http://ai.stanford.edu/~amaas/data/sentiment/aclImdb_v1.tar.gz
下载之后进行解压:tar -zxvf aclImdb.tar.gz,可以用tree命令看一下aclImdb的目录结构:
tree aclImdb -L 2
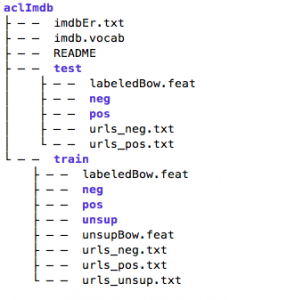
继续进入训练集正例的目录看一下: cd aclImdb/train/pos/:
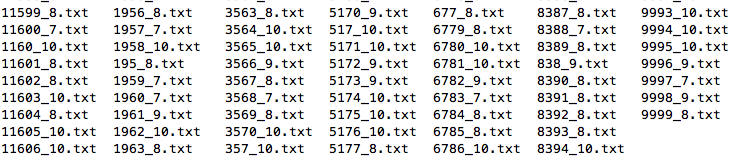
这个里面包含了12500篇英文评论,我们随机打开一个看一下里面的文本内容:
vim 1234_10.txt
I grew up watching this movie ,and I still love it just as much today as when i was a kid. Don't listen to the critic reviews. They are not accurate on this film.Eddie Murphy really shines in his roll.You can sit down with your whole family and everybody will enjoy it.I recommend this movie to everybody to see. It is a comedy with a touch of fantasy.With demons ,dragons,and a little bald kid with God like powers.This movie takes you from L.A. to Tibet , of into the amazing view of the wondrous temples of the mountains in Tibet.Just a beautiful view! So go do your self a favor and snatch this one up! You wont regret it!
在预处理之前,还要想好目标是什么?这里主要想复用一下Keras的相关接口,Keras官方提供了一个调用imdb预处理数据的Python脚本imdb.py,但是(貌似)没有提供做这个数据的脚本(如果提供了,也不用写这篇文章了),这个脚本在Keras官方的github路径如下:
https://github.com/keras-team/keras/blob/master/keras/datasets/imdb.py
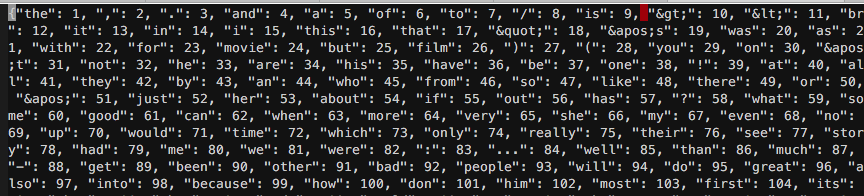
这个脚本主要读两个数据,一个是 imdb_word_index.json ,另外一个是 imdb.npz。前者是单词索引文件,按单词频率高低排序,第一个索引是"the: 1", 可以看一下:

后者是Numpy NPZ 文件,存了多个 numpy 数组文件,这里主要包括imdb的训练集和测试集基于上面的单词索引文件转化为id后的数据,我们看一下:
1 2 3 4 5 6 7 8 9 10 11 12 13 14 15 16 17 18 19 20 21 22 23 24 25 26 27 28 29 30 31 32 33 34 35 36 37 38 39 40 | In [1]: import numpy as np In [2]: f = np.load('imdb.npz') In [3]: f.keys() Out[3]: ['x_test', 'x_train', 'y_train', 'y_test'] In [4]: x_train, y_train, x_test, y_test = f['x_train'], f['y_train'], f['x_test'], f['y_test'] In [5]: len(x_train), len(y_train), len(x_test), len(y_test) Out[5]: (25000, 25000, 25000, 25000) In [6]: x_train.shape Out[6]: (25000,) In [7]: y_train.shape Out[7]: (25000,) ... In [12]: x_train[0:2] Out[12]: array([ [23022, 309, 6, 3, 1069, 209, 9, 2175, 30, 1, 169, 55, 14, 46, 82, 5869, 41, 393, 110, 138, 14, 5359, 58, 4477, 150, 8, 1, 5032, 5948, 482, 69, 5, 261, 12, 23022, 73935, 2003, 6, 73, 2436, 5, 632, 71, 6, 5359, 1, 25279, 5, 2004, 10471, 1, 5941, 1534, 34, 67, 64, 205, 140, 65, 1232, 63526, 21145, 1, 49265, 4, 1, 223, 901, 29, 3024, 69, 4, 1, 5863, 10, 694, 2, 65, 1534, 51, 10, 216, 1, 387, 8, 60, 3, 1472, 3724, 802, 5, 3521, 177, 1, 393, 10, 1238, 14030, 30, 309, 3, 353, 344, 2989, 143, 130, 5, 7804, 28, 4, 126, 5359, 1472, 2375, 5, 23022, 309, 10, 532, 12, 108, 1470, 4, 58, 556, 101, 12, 23022, 309, 6, 227, 4187, 48, 3, 2237, 12, 9, 215], [23777, 39, 81226, 14, 739, 20387, 3428, 44, 74, 32, 1831, 15, 150, 18, 112, 3, 1344, 5, 336, 145, 20, 1, 887, 12, 68, 277, 1189, 403, 34, 119, 282, 36, 167, 5, 393, 154, 39, 2299, 15, 1, 548, 88, 81, 101, 4, 1, 3273, 14, 40, 3, 413, 1200, 134, 8208, 41, 180, 138, 14, 3086, 1, 322, 20, 4930, 28948, 359, 5, 3112, 2128, 1, 20045, 19339, 39, 8208, 45, 3661, 27, 372, 5, 127, 53, 20, 1, 1983, 7, 7, 18, 48, 45, 22, 68, 345, 3, 2131, 5, 409, 20, 1, 1983, 15, 3, 3238, 206, 1, 31645, 22, 277, 66, 36, 3, 341, 1, 719, 729, 3, 3865, 1265, 20, 1, 1510, 3, 1219, 2, 282, 22, 277, 2525, 5, 64, 48, 42, 37, 5, 27, 3273, 12, 6, 23030, 75120, 2034, 7, 7, 3771, 3225, 34, 4186, 34, 378, 14, 12583, 296, 3, 1023, 129, 34, 44, 282, 8, 1, 179, 363, 7067, 5, 94, 3, 2131, 16, 3, 5211, 3005, 15913, 21720, 5, 64, 45, 26, 67, 409, 8, 1, 1983, 15, 3261, 501, 206, 1, 31645, 45, 12583, 2877, 26, 67, 78, 48, 26, 491, 16, 3, 702, 1184, 4, 228, 50, 4505, 1, 43259, 20, 118, 12583, 6, 1373, 20, 1, 887, 16, 3, 20447, 20, 24, 3964, 5, 10455, 24, 172, 844, 118, 26, 188, 1488, 122, 1, 6616, 237, 345, 1, 13891, 32804, 31, 3, 39870, 100, 42, 395, 20, 24, 12130, 118, 12583, 889, 82, 102, 584, 3, 252, 31, 1, 400, 4, 4787, 16974, 1962, 3861, 32, 1230, 3186, 34, 185, 4310, 156, 2325, 38, 341, 2, 38, 9048, 7355, 2231, 4846, 2, 32880, 8938, 2610, 34, 23, 457, 340, 5, 1, 1983, 504, 4355, 12583, 215, 237, 21, 340, 5, 4468, 5996, 34689, 37, 26, 277, 119, 51, 109, 1023, 118, 42, 545, 39, 2814, 513, 39, 27, 553, 7, 7, 134, 1, 116, 2022, 197, 4787, 2, 12583, 283, 1667, 5, 111, 10, 255, 110, 4382, 5, 27, 28, 4, 3771, 12267, 16617, 105, 118, 2597, 5, 109, 3, 209, 9, 284, 3, 4325, 496, 1076, 5, 24, 2761, 154, 138, 14, 7673, 11900, 182, 5276, 39, 20422, 15, 1, 548, 5, 120, 48, 42, 37, 257, 139, 4530, 156, 2325, 9, 1, 372, 248, 39, 20, 1, 82, 505, 228, 3, 376, 2131, 37, 29, 1023, 81, 78, 51, 33, 89, 121, 48, 5, 78, 16, 65, 275, 276, 33, 141, 199, 9, 5, 1, 3273, 302, 4, 769, 9, 37, 17648, 275, 7, 7, 39, 276, 11, 19, 77, 6018, 22, 5, 336, 406]], dtype=object) In [13]: y_train[0:2] Out[13]: array([1, 1]) In [14]: x_test.shape Out[14]: (25000,) In [15]: y_test.shape Out[15]: (25000,) In [16]: x_test[0:2] Out[16]: array([ [10, 432, 2, 216, 11, 17, 233, 311, 100, 109, 27791, 5, 31, 3, 168, 366, 4, 1920, 634, 971, 12, 10, 13, 5523, 5, 64, 9, 85, 36, 48, 10, 694, 4, 13059, 15969, 26, 13, 61, 499, 5, 78, 209, 10, 13, 352, 15969, 253, 1, 106, 4, 3270, 14998, 52, 70, 2, 1839, 11762, 253, 1019, 7655, 16, 138, 12866, 1, 1910, 4, 3, 49, 17, 6, 12, 9, 67, 2885, 16, 260, 1435, 11, 28, 119, 615, 12, 1, 433, 747, 60, 13, 2959, 43, 13, 3080, 31, 2126, 312, 1, 83, 317, 4, 1, 17, 2, 68, 1678, 5, 1671, 312, 1, 330, 317, 134, 14200, 1, 747, 10, 21, 61, 216, 108, 369, 8, 1671, 18, 108, 365, 2068, 346, 14, 70, 266, 2721, 21, 5, 384, 256, 64, 95, 2575, 11, 17, 13, 84, 2, 10, 1464, 12, 22, 137, 64, 9, 156, 22, 1916], [281, 676, 164, 985, 5696, 1157, 53, 24, 2425, 2013, 1, 3357, 186, 11603, 16, 11, 220, 2572, 2252, 450, 41, 1, 21308, 1203, 587, 908, 118, 3, 182, 295, 47415, 5157, 36, 24, 4486, 975, 5, 294, 426, 24, 7117, 8, 48, 13, 2275, 14, 1, 830, 497, 123, 253, 143, 54, 334, 4, 8891, 2, 131, 10465, 9594, 2252, 1551, 23, 3, 9591, 3, 2517, 88, 1030, 221, 5, 1755, 959, 16, 4628, 2, 2376, 129, 18, 46, 86, 11, 19, 13, 8480, 29, 1, 169, 7, 7, 1, 19, 514, 16, 46, 1515, 633, 895, 835, 3, 51329, 307, 4, 1, 1122, 633, 895, 4, 27000, 49040, 2, 5544, 18, 35402, 364, 1361, 15, 91, 83, 31, 1, 1393, 531, 277, 1, 203, 1099, 5, 1, 1203, 587, 908, 180, 1258, 53, 52, 70, 5696, 124, 3, 324, 289, 2, 284, 3, 9408, 15, 1131, 3664, 15697, 10, 444, 1, 2514, 11836, 4223, 4, 1, 203, 20, 248, 104, 4, 1, 908, 12, 19323, 1, 111, 1034, 39, 760, 46, 2073, 1984, 1134, 5, 1, 3917, 222, 46, 1441, 106, 940, 51, 1, 695, 1332, 6, 2365, 31, 1215, 4, 1, 15171, 8, 325, 3672, 2, 347, 6085, 34, 2727, 24, 220, 17370, 14, 3, 503, 5, 94, 93, 15, 3, 8891, 262, 26, 79, 124, 3, 49, 289, 4, 2006, 5004, 48, 268, 20, 8, 1, 73329, 1825, 464, 5097, 8891, 3, 2146, 354, 4106, 6, 836, 6313, 1236, 130, 1106, 141, 79, 27, 345, 1, 267, 16132, 2, 2295, 2547, 15, 1852, 32, 1725, 807, 415, 838, 4, 1313, 2, 5788, 30, 1, 451, 4, 1, 10257, 1114, 7, 7, 22, 121, 86, 11, 6, 167, 5, 127, 21, 61, 85, 42, 445, 20, 3, 280, 62, 18, 79, 85, 105, 8, 11, 509, 791, 1, 169, 14212, 117, 2, 117, 18, 5696, 1454, 20, 3, 125, 71, 853, 120, 2, 379, 10442, 50, 673, 493, 1, 367, 71, 26, 123, 66, 8, 1008, 4, 9, 463, 1, 4374, 873, 11, 6, 3, 324, 2, 773, 19, 5, 3660, 15, 12, 1012, 5, 166, 32, 308]], dtype=object) In [17]: y_test[0:2] Out[17]: array([1, 1]) |
现在就可以按照这个思路处理原始的aclIMDB数据了,我已在Github上建了一个项目: AINLP(与我们的公众号AINLP同名,欢迎同时关注), 子项目 aclimdb_sentiment_analysis_from_scratch 里分别提供了几个Python脚本,兼容Python2和Python3, 已在Python2.7和Python 3.6, 3.7的环境下运行通过(其他没测),不过在运行这几个脚本之前,需要先安装一下相关的依赖:requirement.txt
numpy==1.15.2
sacremoses==0.0.5
six==1.11.0
其中sacremoses提供了英文tokenizer的接口,之前是通过NLTK调用里面的MosesTokenizer,但是发现最近这个接口因开源证书的问题从NLTK里面移除了,sacremoses是单独移植的一个版本,接口完全一致。首先来建立单词索引,由脚本 build_word_index.py 来完成,这里只处理训练集和测试集中的数据,忽略没有标签的数据(unsup):
1 2 3 4 5 6 7 8 9 10 11 12 13 14 15 16 17 18 19 20 21 22 23 24 25 26 27 28 29 30 31 32 33 34 35 36 37 38 39 40 41 42 43 44 45 46 47 48 49 50 51 52 53 54 55 56 57 58 59 60 61 62 63 64 65 66 67 68 69 | #!/usr/bin/env python # -*- coding: utf-8 -*- # Author: TextMiner (textminer@foxmail.com) # Copyright 2018 @ AINLP from __future__ import absolute_import from __future__ import division from __future__ import print_function import argparse import json import numpy as np import re import six from collections import OrderedDict from os import walk from sacremoses import MosesTokenizer tokenizer = MosesTokenizer() def build_word_index(input_dir, output_json): word_count = OrderedDict() for root, dirs, files in walk(input_dir): for filename in files: if re.match(".*\d+_\d+.txt", filename): filepath = root + '/' + filename print(filepath) if 'unsup' in filepath: continue with open(filepath, 'r') as f: for line in f: if six.PY2: tokenize_words = tokenizer.tokenize( line.decode('utf-8').strip()) else: tokenize_words = tokenizer.tokenize(line.strip()) lower_words = [word.lower() for word in tokenize_words] for word in lower_words: if word not in word_count: word_count[word] = 0 word_count[word] += 1 words = list(word_count.keys()) counts = list(word_count.values()) sorted_idx = np.argsort(counts) sorted_words = [words[ii] for ii in sorted_idx[::-1]] word_index = OrderedDict() for ii, ww in enumerate(sorted_words): word_index[ww] = ii + 1 with open(output_json, 'w') as fp: json.dump(word_index, fp) if __name__ == '__main__': parser = argparse.ArgumentParser() parser.add_argument('-id', '--input_dir', type=str, nargs='?', default='./data/aclImdb/', help='input data directory') parser.add_argument('-ot', '--output_json', type=str, nargs='?', default='./data/aclimdb_word_index.json', help='output word index dict json') args = parser.parse_args() input_dir = args.input_dir output_json = args.output_json build_word_index(input_dir, output_json) |
注意里面的文件目录位置,我的文件结构大概是这样的:

这里把解压后的aclIMDB目录放在data下,如果你按这个结构来安排数据,就可以直接执行,否则,请根据程序里的参数指定文件目录。运行:
python build_word_index.py
程序执行完毕后在data目录下产生一个单词索引文件:aclimdb_word_index.json ,因为程序中使用了OrderedDict, dump之后的json文件还能看到有序的单词索引,注意,这里没有清除标点符号, 也没有去掉 html tag,有兴趣的同学可以试试进一步完善:
接下来,我们提供第二个脚本 build_data_index.py 对训练集和测试集进行处理,基于上一个脚本产生的单词索引文件 aclimdb_word_index.json 将训练集和测试集的明文转换为数字id,生成4个numpy数组(x_train, y_train, x_test, y_test),并存储为npz文件:
1 2 3 4 5 6 7 8 9 10 11 12 13 14 15 16 17 18 19 20 21 22 23 24 25 26 27 28 29 30 31 32 33 34 35 36 37 38 39 40 41 42 43 44 45 46 47 48 49 50 51 52 53 54 55 56 57 58 59 60 61 62 63 64 65 66 67 68 69 70 71 72 73 74 75 76 77 78 79 80 81 82 83 | #!/usr/bin/env python # -*- coding: utf-8 -*- # Author: TextMiner (textminer@foxmail.com) # Copyright 2018 @ AINLP from __future__ import absolute_import from __future__ import division from __future__ import print_function import argparse import json import numpy as np import re import six from collections import OrderedDict from os import walk from sacremoses import MosesTokenizer tokenizer = MosesTokenizer() def get_word_index(word_index_path): with open(word_index_path) as f: return json.load(f) def build_data_index(input_dir, word_index): train_x = [] train_y = [] for root, dirs, files in walk(input_dir): for filename in files: if re.match(".*\d+_\d+.txt", filename): filepath = root + '/' + filename print(filepath) if 'pos' in filepath: train_y.append(1) elif 'neg' in filepath: train_y.append(0) else: continue train_list = [] with open(filepath, 'r') as f: for line in f: if six.PY2: tokenize_words = tokenizer.tokenize( line.decode('utf-8').strip()) else: tokenize_words = tokenizer.tokenize(line.strip()) lower_words = [word.lower() for word in tokenize_words] for word in lower_words: train_list.append(word_index.get(word, 0)) train_x.append(train_list) return train_x, train_y if __name__ == '__main__': parser = argparse.ArgumentParser() parser.add_argument('-trd', '--train_dir', type=str, nargs='?', default='./data/aclImdb/train/', help='train data directory') parser.add_argument('-ted', '--test_dir', type=str, nargs='?', default='./data/aclImdb/test/', help='test data directory') parser.add_argument('-wip', '--word_index_path', type=str, nargs='?', default='./data/aclimdb_word_index.json', help='aclimdb word index json') parser.add_argument('-onz', '--output_npz', type=str, nargs='?', default='./data/aclimdb.npz', help='output npz') args = parser.parse_args() train_dir = args.train_dir test_dir = args.test_dir word_index_path = args.word_index_path output_npz = args.output_npz word_index = get_word_index(word_index_path) train_x, train_y = build_data_index(train_dir, word_index) test_x, test_y = build_data_index(test_dir, word_index) np.savez(output_npz, x_train=np.asarray(train_x), y_train=np.asarray(train_y), x_test=np.asarray(test_x), y_test=np.asarray(test_y)) |
运行这个脚本 python build_data_index.py 之后会在data目录下生成一个 aclimdb.npz 文件,这个文件和官方imdb.npz的结构是一致的,这里就不展开了。
到目前为止,两份数据已经准备的差不多了,但是Kereas官方提供的 imdb.py 貌似不支持指定本地文件路径,所以这里模仿 imdb.py 脚本写了一个简化版的 aclimdb.py , 用来支持上述两个本地文件调用:
1 2 3 4 5 6 7 8 9 10 11 12 13 14 15 16 17 18 19 20 21 22 23 24 25 26 27 28 29 30 31 32 33 34 35 36 37 38 39 40 41 42 43 44 45 46 47 48 49 50 51 52 53 54 55 56 57 58 59 60 61 62 | #!/usr/bin/env python # -*- coding: utf-8 -*- # Author: TextMiner (textminer@foxmail.com) # Copyright 2018 @ AINLP from __future__ import absolute_import from __future__ import division from __future__ import print_function import json import numpy as np def get_word_index(path='./data/aclimdb_word_index.json'): with open(path) as f: return json.load(f) def load_data(path='./data/aclimdb.npz', num_words=None, skip_top=0, seed=113, start_char=1, oov_char=2, index_from=3): """A simplify version of the origin imdb.py load_data function https://github.com/keras-team/keras/blob/master/keras/datasets/imdb.py """ with np.load(path) as f: x_train, labels_train = f['x_train'], f['y_train'] x_test, labels_test = f['x_test'], f['y_test'] np.random.seed(seed) indices = np.arange(len(x_train)) np.random.shuffle(indices) x_train = x_train[indices] labels_train = labels_train[indices] indices = np.arange(len(x_test)) np.random.shuffle(indices) x_test = x_test[indices] labels_test = labels_test[indices] xs = np.concatenate([x_train, x_test]) labels = np.concatenate([labels_train, labels_test]) if start_char is not None: xs = [[start_char] + [w + index_from for w in x] for x in xs] elif index_from: xs = [[w + index_from for w in x] for x in xs] if not num_words: num_words = max([max(x) for x in xs]) # 0 (padding), 1 (start), 2(OOV) if oov_char is not None: xs = [[w if (skip_top <= w < num_words) else oov_char for w in x] for x in xs] else: xs = [[w for w in x if skip_top <= w < num_words] for x in xs] idx = len(x_train) x_train, y_train = np.array(xs[:idx]), np.array(labels[:idx]) x_test, y_test = np.array(xs[idx:]), np.array(labels[idx:]) return (x_train, y_train), (x_test, y_test) |
现在,可以按《Python深度学习》书中第3.4节的流程来快速过一遍我们自己处理的数据了,这里测试的环境是Mac OS, Python 2.7, Keras 2.14, Tensorflow 1.6.0, CPU环境,这个模型训练无需GUP也很快,请注意在上述几个代码存放的目录执行相关代码:
1 2 3 4 5 6 7 8 9 10 11 12 13 14 15 16 17 18 19 20 21 22 23 24 25 26 27 28 29 30 31 32 33 34 35 36 37 38 39 40 41 42 43 44 45 46 47 48 49 50 51 52 53 54 55 56 57 58 59 60 61 62 63 64 65 66 67 68 69 70 71 72 73 74 75 76 77 78 79 80 81 82 83 84 85 86 87 88 89 90 91 92 93 94 | In [1]: import aclimdb # 注意,代码里已经写了数据文件aclimdb.npz的相对路径,如果在其他位置运行,请加上参数path In [2]: (train_data, train_labels), (test_data, test_labels) = aclimdb.load_data(num_words=10000) In [3]: train_data[0] Out[3]: [1, 7799, 1459, ... 11, 13, 3320, 2] In [4]: train_labels[0] Out[4]: 0 In [5]: max([max(sequence) for sequence in train_data]) Out[5]: 9999 In [6]: word_index = aclimdb.get_word_index() In [8]: reverse_word_index = dict([(value, key) for (key, value) in word_index.items()]) In [9]: decoded_review = ' '.join([reverse_word_index.get(i - 3, '?') for i in train_data[0]]) In [10]: decoded_review Out[10]: u'? hi folks < br / > < br / > forget about that movie . john c. should be ashamed that he appears as executive producer in the ? bon ? has never been and will never be an actor and the fx are a joke . < br / > < br / > the first vampires was good ... and it was the only vampires . this thing here just wears the same name . < br / > < br / > just a waste of time thinks ... < br / > < br / > jake ?' In [11]: import numpy as np In [13]: def vectorize_sequences(sequences, dimension=10000): ...: results = np.zeros((len(sequences), dimension)) ...: for i, sequence in enumerate(sequences): ...: results[i, sequence] = 1 ...: return results ...: In [14]: x_train = vectorize_sequences(train_data) In [15]: x_test = vectorize_sequences(test_data) In [16]: x_train[0] Out[16]: array([0., 1., 1., ..., 0., 0., 0.]) In [17]: y_train = np.asarray(train_labels).astype('float32') In [18]: y_test = np.asarray(test_labels).astype('float32') In [19]: from keras import models Using TensorFlow backend. In [20]: from keras import layers In [21]: model = models.Sequential() In [22]: model.add(layers.Dense(16, activation='relu', input_shape=(10000,))) In [23]: model.add(layers.Dense(16, activation='relu')) In [24]: model.add(layers.Dense(1, activation='sigmoid')) In [25]: model.compile(optimizer='rmsprop', ...: loss='binary_crossentropy', ...: metrics=['accuracy']) In [26]: model.fit(x_train, y_train, epochs=4, batch_size=512) Epoch 1/4 25000/25000 [==============================] - 3s 140us/step - loss: 0.4544 - acc: 0.8192 Epoch 2/4 25000/25000 [==============================] - 2s 93us/step - loss: 0.2632 - acc: 0.9077 Epoch 3/4 25000/25000 [==============================] - 2s 92us/step - loss: 0.2053 - acc: 0.9244 Epoch 4/4 25000/25000 [==============================] - 2s 92us/step - loss: 0.1708 - acc: 0.9388 Out[26]: <keras.callbacks.History at 0x206cfdc10> In [27]: resuls = model.evaluate(x_test, y_test) 25000/25000 [==============================] - 4s 145us/step In [28]: resuls Out[28]: [0.2953770682477951, 0.88304] In [29]: model.predict(x_test) Out[29]: array([[9.9612302e-01], [9.5416462e-01], [1.5807265e-05], ..., [9.9868757e-01], [8.4713501e-01], [5.7828808e-01]], dtype=float32) |
详细的细节请参考《Python深度学习》,无论英文版还是中文翻译版都写得比较清楚,这里就不做补充了。最后,欢迎大家关注我们的github项目: AINLP,预期配套这个系列相关的文章和教程,欢迎大家关注,也欢迎大家关注我们的微信号: AINLP,有问题随时反馈和交流:

注:原创文章,转载请注明出处及保留链接“我爱自然语言处理”:https://www.52nlp.cn
本文链接地址:深度学习实践:从零开始做电影评论文本情感分析 https://www.52nlp.cn/?p=10887
很好的教程,非常感谢。
[回复]
赞
[回复]
请问最后一部分代码要在哪里运行才行啊?
[回复]
52nlp 回复:
20 1 月, 2019 at 19:47
哪一部分?只要指定好相关数据或者模型的路径运行即可
[回复]
呼噜噜噜 回复:
20 1 月, 2019 at 20:06
最后一步我import aclimdb的时候报错说ModuleNotFoundError是怎么回事呀?我已经输入它所在的路径了
[回复]
52nlp 回复:
21 1 月, 2019 at 10:09
执行的时候应该和脚本同目录
请问这个能用作中文文本的情感分析的 不同之处能指导二三吗
[回复]
52nlp 回复:
6 4 月, 2019 at 09:12
可能就是差个中文分词,中文分词之后套路是一致的
[回复]