深度学习环境部署的方法有很多种,其中Docker化深度学习环境和项目是一个很不错的选择。这里写过一些深度学习主机安装和部署的文章,这篇文章记录一下相关的通过Docker来部署和测试深度学习项目的一些经验,以下是在一台4卡1080TI,Ubutu16.04的机器上的记录。
一、安装Docker:
关于Docker的相关介绍资料比较多,这里就不多说了,感兴趣的同学可以自行Google或者看一下参考资料。
1)使用APT安装:
$ sudo apt-get update

$ sudo apt-get install \
        apt-transport-https \
        ca-certificates \
        curl \
            software-properties-common
2) 使用国内源:
curl -fsSL https://mirrors.ustc.edu.cn/docker-ce/linux/ubuntu/gpg | sudo apt-key add -
# 官方源
# $ curl -fsSL https://download.docker.com/linux/ubuntu/gpg | sudo apt-key add -
3) 向source_list添加Docker源:
$ sudo add-apt-repository \
            "deb [arch=amd64] https://mirrors.ustc.edu.cn/docker-ce/linux/ubuntu
            \
                $(lsb_release -cs) \
                stable"

# 官方源
# $ sudo add-apt-repository \
#    "deb [arch=amd64] https://download.docker.com/linux/ubuntu \
#    $(lsb_release -cs) \
#    stable"
4)更新 apt 软件包缓存,并安装 docker-ce:
$ sudo apt-get update
$ sudo apt-get install docker-ce
5) 添加用户组(安装后貌似这个组已经存在了):
sudo groupadd docker
6) 将当期用户添加到这个组里并退出重新登录:
sudo usermod -aG docker $USER
7) 测试Docker:
docker run hello-world
8) 添加过内镜像代理:
sudo vim /etc/docker/daemon.json
{
    "registry-mirrors": [
        "https://registry.docker-cn.com"
    ]
}
9)重启Docker服务
sudo systemctl daemon-reload
sudo systemctl restart docker
二、安装nvidia-docker:
单独安装Docker之后还无法使用带GPU的深度学习机器,需要再安装一下英伟达出品的Nvidia-docker。
1)安装:
# Add the package repositories
$ distribution=$(. /etc/os-release;echo $ID$VERSION_ID)
$ curl -s -L https://nvidia.github.io/nvidia-docker/gpgkey | sudo apt-key add -
$ curl -s -L https://nvidia.github.io/nvidia-docker/$distribution/nvidia-docker.list | sudo tee /etc/apt/sources.list.d/nvidia-docker.list

$ sudo apt-get update && sudo apt-get install -y nvidia-container-toolkit
$ sudo systemctl restart docker
2)测试:
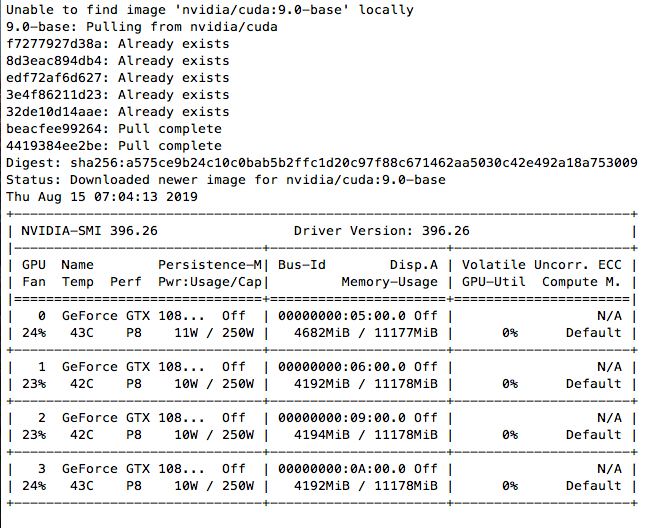
现在可以测试了,以下是在一台4卡1080TI机器上的测试结果,宿主机CUDA版本为9.2:
docker run --gpus all nvidia/cuda:9.0-base nvidia-smi
第一次运行的时候结果大致如下,需要从官方镜像拉取:
完整用法可以参考nvidia-docker官方github:
#### Test nvidia-smi with the latest official CUDA image
$ docker run --gpus all nvidia/cuda:9.0-base nvidia-smi

# Start a GPU enabled container on two GPUs
$ docker run --gpus 2 nvidia/cuda:9.0-base nvidia-smi

# Starting a GPU enabled container on specific GPUs
$ docker run --gpus '"device=1,2"' nvidia/cuda:9.0-base nvidia-smi
$ docker run --gpus '"device=UUID-ABCDEF,1'" nvidia/cuda:9.0-base nvidia-smi

# Specifying a capability (graphics, compute, ...) for my container
# Note this is rarely if ever used this way
$ docker run --gpus all,capabilities=utility nvidia/cuda:9.0-base nvidia-smi
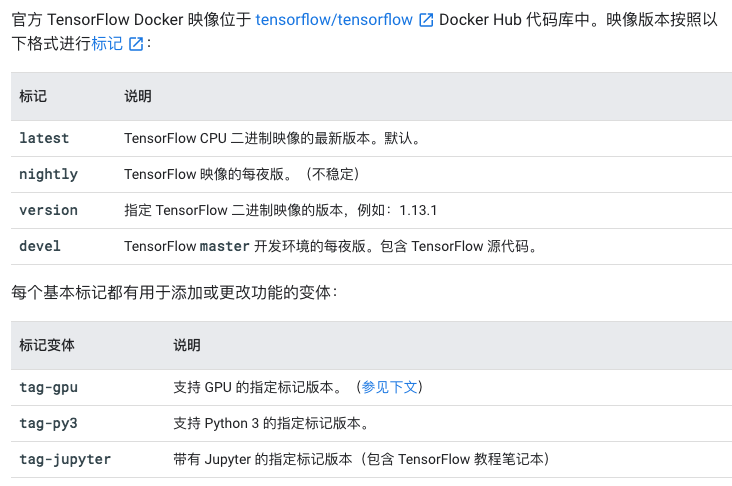
三、测试 Tensorflow Docker 镜像
几乎所有的深度学习框架都提供了Docker镜像,这里以Tensorflow Docker镜像为例,来玩一下 Tensorflow,Tensorflow Docker的版本是通过Docker Tag区分的:
1)默认拉取的Tensorflow镜像是CPU版本:
docker pull tensorflow/tensorflow
运行bash:
docker run -it tensorflow/tensorflow bash
现在可以在Tensorflow Docker下执行python,可以看得出这是CPU版本的Tensorflow:
root@ed70090804e5:/# python Python 2.7.15+ (default, Nov 27 2018, 23:36:35) [GCC 7.3.0] on linux2 Type "help", "copyright", "credits" or "license" for more information. >>> import tensorflow as tf >>> tf.__version__ '1.14.0' >>> sess = tf.Session(config=tf.ConfigProto(log_device_placement=True)) 2019-08-15 09:32:38.522061: I tensorflow/core/platform/cpu_feature_guard.cc:142] Your CPU supports instructions that this TensorFlow binary was not compiled to use: AVX2 FMA 2019-08-15 09:32:38.549054: I tensorflow/core/platform/profile_utils/cpu_utils.cc:94] CPU Frequency: 3598085000 Hz 2019-08-15 09:32:38.550255: I tensorflow/compiler/xla/service/service.cc:168] XLA service 0x556fa8e5dd60 executing computations on platform Host. Devices: 2019-08-15 09:32:38.550282: I tensorflow/compiler/xla/service/service.cc:175] StreamExecutor device (0): <undefined>, <undefined> Device mapping: /job:localhost/replica:0/task:0/device:XLA_CPU:0 -> device: XLA_CPU device 2019-08-15 09:32:38.551424: I tensorflow/core/common_runtime/direct_session.cc:296] Device mapping: /job:localhost/replica:0/task:0/device:XLA_CPU:0 -> device: XLA_CPU device |
2)获取GPU版本的Tensorflow-devel镜像:
docker pull tensorflow/tensorflow:devel-gpu
运行:
docker run --gpus all -it tensorflow/tensorflow:devel-gpu
这里有报错:
docker: Error response from daemon: OCI runtime create failed: container_linux.go:345: starting container process caused "process_linux.go:430: container init caused \"process_linux.go:413: running prestart hook 0 caused \\\"error running hook: exit status 1, stdout: , stderr: exec command: [/usr/bin/nvidia-container-cli --load-kmods configure --ldconfig=@/sbin/ldconfig.real --device=all --compute --utility --require=cuda>=10.0 brand=tesla,driver>=384,driver<385 brand=tesla,driver>=410,driver<411 --pid=9821 /home/dlfour/dockerdata/docker/overlay2/814a65fbfc919d68014a6af2c3d532216a5a622e5540a77967719fd0c695a0cb/merged]\\\\nnvidia-container-cli: requirement error: unsatisfied condition: brand = tesla\\\\n\\\"\"": unknown.
仔细看了一下,最新版的Tensorflow GPU Docker 容器需要的是CUDA>=10.0,这台机器是9.2,并不符合,两种解决方案,一种是升级CUDA到10.x版本,但是我暂时不想升级,google了一下,发现这个tag版本可用cuda9.x:1.12.0-gpu ,所以重新拉取Tensorflow相应版本的镜像:
docker pull tensorflow/tensorflow:1.12.0-gpu
运行:
docker run --gpus all -it tensorflow/tensorflow:1.12.0-gpu bash
没有什么问题:
root@c5c2a21f1466:/notebooks# ls 1_hello_tensorflow.ipynb 2_getting_started.ipynb 3_mnist_from_scratch.ipynb BUILD LICENSE root@c5c2a21f1466:/notebooks# python Python 2.7.12 (default, Dec 4 2017, 14:50:18) [GCC 5.4.0 20160609] on linux2 Type "help", "copyright", "credits" or "license" for more information. >>> import tensorflow as tf >>> tf.__version__ '1.12.0' >>> sess = tf.Session(config=tf.ConfigProto(log_device_placement=True)) 2019-08-15 09:52:29.179406: I tensorflow/core/platform/cpu_feature_guard.cc:141] Your CPU supports instructions that this TensorFlow binary was not compiled to use: AVX2 FMA 2019-08-15 09:52:29.376334: I tensorflow/core/common_runtime/gpu/gpu_device.cc:1432] Found device 0 with properties: name: GeForce GTX 1080 Ti major: 6 minor: 1 memoryClockRate(GHz): 1.582 pciBusID: 0000:05:00.0 totalMemory: 10.92GiB freeMemory: 6.20GiB 2019-08-15 09:52:29.527131: I tensorflow/core/common_runtime/gpu/gpu_device.cc:1432] Found device 1 with properties: name: GeForce GTX 1080 Ti major: 6 minor: 1 memoryClockRate(GHz): 1.582 pciBusID: 0000:06:00.0 totalMemory: 10.92GiB freeMemory: 6.68GiB 2019-08-15 09:52:29.702166: I tensorflow/core/common_runtime/gpu/gpu_device.cc:1432] Found device 2 with properties: name: GeForce GTX 1080 Ti major: 6 minor: 1 memoryClockRate(GHz): 1.582 pciBusID: 0000:09:00.0 totalMemory: 10.92GiB freeMemory: 6.67GiB 2019-08-15 09:52:29.846647: I tensorflow/core/common_runtime/gpu/gpu_device.cc:1432] Found device 3 with properties: name: GeForce GTX 1080 Ti major: 6 minor: 1 memoryClockRate(GHz): 1.582 pciBusID: 0000:0a:00.0 totalMemory: 10.92GiB freeMemory: 6.68GiB 2019-08-15 09:52:29.855818: I tensorflow/core/common_runtime/gpu/gpu_device.cc:1511] Adding visible gpu devices: 0, 1, 2, 3 2019-08-15 09:52:30.815240: I tensorflow/core/common_runtime/gpu/gpu_device.cc:982] Device interconnect StreamExecutor with strength 1 edge matrix: 2019-08-15 09:52:30.815280: I tensorflow/core/common_runtime/gpu/gpu_device.cc:988] 0 1 2 3 |
感兴趣的同学还可以尝试Jupyte Notebook版本的镜像,通过端口映射运行,然后就可以通过浏览器测试和学习了。
四、使用 Deepo 镜像
现在的深度学习框架和工具不少,如果一个一个来安装感觉有点繁琐,这个时候就轮到 Deepo 出场了,Deepo的口号是:Set up deep learning environment in a single command line,通过一个命令设置(所有的)深度学习环境,这个命令当然是Docker了:
Deepo is a series of Docker images that
allows you to quickly set up your deep learning research environment
supports almost all commonly used deep learning frameworks
supports GPU acceleration (CUDA and cuDNN included), also works in CPU-only mode
works on Linux (CPU version/GPU version), Windows (CPU version) and OS X (CPU version)
and their Dockerfile generator thatallows you to customize your own environment with Lego-like modules
automatically resolves the dependencies for you
1)获取 Deepo 镜像:
docker pull ufoym/deepo
如果不指定标签,默认拉取的是最新的(latest) deepo 镜像,和Tensorflow Docker镜像一样,这个只支持CUDA10.x,在我的这台机器上无法运行,报错信息同上,所有我看了一下deepo的镜像标签,找了一个老一点的版本重新获取:
docker pull ufoym/deepo:all-py36-cu90
2)运行 Deepo镜像:
docker run --gpus all -it ufoym/deepo:all-py36-cu90 bash
root@b2028ad87b85:/# python Python 3.6.8 (default, Dec 24 2018, 19:24:27) [GCC 5.4.0 20160609] on linux Type "help", "copyright", "credits" or "license" for more information. >>> import tensorflow >>> import torch >>> import keras Using TensorFlow backend. >>> import mxnet >>> import cntk >>> import theano >>> import caffe2 >>> exit() root@b2028ad87b85:/# caffe --version caffe version 1.0.0 root@b2028ad87b85:/# darknet usage: darknetroot@b2028ad87b85:/# th ______ __ | Torch7 /_ __/__ ________/ / | Scientific computing for Lua. / / / _ \/ __/ __/ _ \ | Type ? for help /_/ \___/_/ \__/_//_/ | https://github.com/torch | http://torch.ch th>
看起来是相当方便的,为了最佳体验,推荐安装CUDA10,使用最新的Docker镜像版本。
五)一些 Tips:
1)转移数据目录
Docker的数据目录默认位于/var/lib/docker,里面会存储着Docker镜像的数据,而这份数据会随着Docker镜像的增加而不断增加。历史遗留问题,我的根目录只有15G,在使用Docker过程中时不时的会提醒硬盘空间不足,所以如果其所在的硬盘分区空间较小,可以将其转移到大的磁盘分区。
service docker stop
mkdir /home/docker_data
mv /var/lib/docker /home/docker_ata
ln -s /home/docker_data/docker /var/lib/docker
service docker start
2)清理Docker占用的磁盘空间
查看Docker磁盘空间占用情况
docker system df
用于清理磁盘,删除关闭的容器、无用的数据卷和网络,以及 dangling 镜像(即无 tag 的镜像):
docker system prune
比较彻底的清理:
docker system prune -a
注意,这两个命令会把暂时关闭的容器,以及暂时没有用到的 Docker 镜像都删掉了,所以使用之前一定要想清楚
3) nvidia-docker版本:
nvidia-docker不同版本用法不同,注意区分,我这边目前用的是最新版,之前的版本官方推荐升级
4)私有项目项目部署
深度学习项目有时候会产生一种需求,客户需要本地化私有部署或者指定GPU云服务器部署,这个时候Docker化深度学习项目就会比较方便,可以通过 Docker Registry 进行本地服务器搭建和打包,设置相应的私有镜像地址,在客户机器上只需要安装基础环境,剩下的就是直接进行pull和rename操作,在Dockerfile中通过supervisor之类的设置服务自启动。
最后欢迎有经验的同学进行相关的分享。
参考:
Docker官方文档
Docker — 从入门到实践
Docker官方安装文档
Docker中文实践安装文档
NVIDIA官方Github:nvidia-docker
TensorFlow Docker 映像
Deepo官网
Deepo Github
Docker安装指南以及使用GPU
如何清理Docker占用的磁盘空间?
注:原创文章,转载请注明出处及保留链接“我爱自然语言处理”:https://www.52nlp.cn
本文链接地址:中文自然语言处理相关的开放任务,数据集, 以及当前最佳结果 https://www.52nlp.cn/?p=12109